

While working with Keycloak, I decided I wanted to try using it for a Single Page Application instead of only APIs.
This lead me through a maze of various packages that deals with authentication and most of them didn't work very well with the latest version of Keycloak (at time of writing: version 18).
There's is a official package which I found cumbersome and not very documented for my need, but then again - I am not an experienced frontend developer so your mileage may vary.
Instead, I turned to the one I've used before when working with Azure Active Directory or Azure B2C - Microsoft Authentication Library for Javascript (MSAL) .
The trouble with that is that by default, it expects Azure AD.
But luckily - it is configurable! Which is something I would encourage anyone writing code to support a standard - allow for custom configuration.
In this case, it's mostly about where to find the endpoints because both Azure Active Directory and Keycloak fully implement the OAuth2 protocol - but their endpoints are different and by default MSAL will look at login.microsoftonline.com as mentioned.
The complete code can be found here: FrodeHus/react-spa-keycloak (github.com)
Creating the sample application
I'm not a SPA wizard so I'll just go ahead and create a next.js application with Typescript (from the official docs) :
npx create-next-app@latest --ts
# or
yarn create next-app --typescript
# or
pnpm create next-app --tsNext, we need to install the required packages:
npm install @azure/msal-react --save
npm install @azure/msal-browser --save
Ok, so now we have the basics....
Set up Keycloak as the authentication provider
Lets create a new file under pages, call it auth.tsx and add the following:
import * as msal from "@azure/msal-browser";
export const MsalInstance = new msal.PublicClientApplication({
  auth: {
    protocolMode: msal.ProtocolMode.OIDC,
    authorityMetadata: JSON.stringify({
      authorization_endpoint:
        "https://<your-keycloak-url>/realms/<your-keycloak-realm>/protocol/openid-connect/auth",
      token_endpoint:
        "https://<your-keycloak-url>/realms/<your-keycloak-realm>/protocol/openid-connect/token",
      issuer: "https://<your-keycloak-url>/realms/<your-keycloak-realm>",
      userinfo_endpoint:
        "https://<your-keycloak-url>/realms/<your-keycloak-realm>/protocol/openid-connect/userinfo",
    }),
    authority: "https://<your-keycloak-url>/realms/<your-keycloak-realm>",
    clientId: "<your-desired-keycloak-client>",
    knownAuthorities: ["https://<your-keycloak-url>/realms/<your-keycloak-realm>"],
  },
});
That's a lot - lets dig into it!
protocolMode is pretty much self-explanatory - we want OpenID Connect or OIDC.
The big and crucially important one is authorityMetdata - this is were we override the default settings that come with MSAL (which assumes Azure Active Directory).
In particular we need the authorization_endpoint and token_endpoint as well as the issuer. The rest is nice-to-have.
These URLs can be found under Realm Settings:
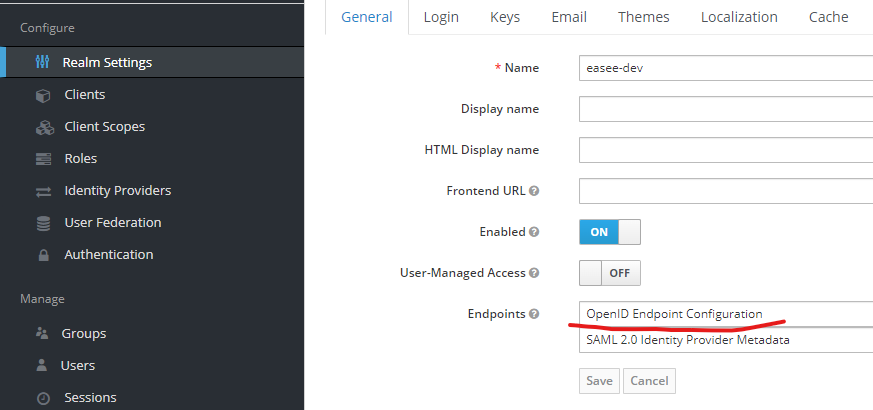
We also need to set authority to our Keycloak instance and our realm. This has changed from previous versions of Keycloak, but with the latest versions the URL is https://<your server>/realms/<your realm>
We also need to configure knownAuthorities otherwise MSAL will be sad. Set this to an array with authority as the only element.
Next up we need to specify which client we wish to target when authenticating.
From Keycloak's documentation:
Clients are entities that can request Keycloak to authenticate a user. Most often, clients are applications and services that want to use Keycloak to secure themselves and provide a single sign-on solution. Clients can also be entities that just want to request identity information or an access token so that they can securely invoke other services on the network that are secured by Keycloak.
Creating a Keycloak client
There is already a client demo registered if you use the Docker Compose configuration in the Github repo, but if you want to create your own - here's how:
Click create under Clients

This will bring you to the initial client creation page

Just fill in your desired Client ID (which coincidentally will be the name you specify in the clientId configuration of MSAL) and click Save.
You are now pretty much good to go - however, to be a safe, responsible and totally cool interwebs person (I don't know the hip lingo these days) you should, nay 👆, must specify Valid Redirect Urls - this will help you stay safe and protected against people trying to steal your secrets.
Scroll on down on the page and find Valid Redirect URLs and add your web application URLs here - this is the URLs that will receive top secret information and no one else is allowed.

Now, add this Client ID to the clientId configuration.
Putting it all together
Go back to your favourite IDE and open up _app.tsx.
We need to wrap our application with our MSAL Provider so it is available to any pages within it.
function MyApp({ Component, pageProps }: AppProps) {
  return (
    <MsalProvider instance={MsalInstance}>
      <Component {...pageProps} />
    </MsalProvider>
  );
}
Now, we are ready to make use of our fancy Keycloak authentication.
We'll need our MSAL instance so let's add it with:
const { instance, accounts } = useMsal();MSAL provides nifty <AuthenticatedTemplate/> and <UnauthenticatedTemplate/> which allows us to easily define what is seen by authenticated users and unauthenticated users respectively.
In index.tsx we can now add our Sign in button for unauthenticated users with this:
 <UnauthenticatedTemplate>
 	<button onClick={() => instance.loginPopup()} className={styles.card}>
		Sign in
 	</button>
 </UnauthenticatedTemplate>
When we've signed in, we want to retrieve our name and display it (as we do - it's mandatory).
const name = accounts[0] && accounts[0].name; <AuthenticatedTemplate>
<div>
<p className={styles.description}>Good to see you, {name}</p>
</div>
</AuthenticatedTemplate>For the full source code, have a look at FrodeHus/react-spa-keycloak (github.com) which also have code how to retrieve access tokens for use with any backend APIs.
Summary
So, that's how you can use MSAL with Keycloak. As I mentioned, there are many ways of doing this so choose the one you are comfortable with.
These snippets can be hard to follow, but just mosey on over to yonder Github repo and you can see how it all fits together. It even has a handy docker-compose.yml that will start a Keycloak instance for you with a ready-to-use realm!